The selection of the manufacturing process can also be influenced by the simulation results and limitations of traditional gear tooth finishing methods. Software simulations revealed that the tolerance of the start of tip relief had a significant impact on the PPTE values. Previous gear projects involving gears of similar size indicated that even with controlled heat treatment and an additional stress-relieving cycle, shaving could only achieve start-of-tip-relief roll angle tolerances of ±1.5 degrees. Simulation data indicated that this would lead to a notable increase in PPTE values. Further attempts to address this issue are discussed in the article “Lessons Learned from Earlier Trials” later in the paper. It became evident that gear shaving was not a viable solution to reduce these gear excitations. Gears that were originally manufactured under DIN 9 grade (using shaving) were upgraded to DIN 7 grade (using grinding) by opting for hard grinding as the finishing process. It is important to note that all gears underwent heat treatment for case carburizing throughout the trials mentioned in this paper.
From the first attempts at grinding the gear flanks, a sharp edge was visible at the transition between the involute and tip relief zones of the profiles. This sharp edge was a result of high tip relief amounts along with linear tip relief grinding method causing a sudden transition from pure involute. This sharp edge could have potentially caused its own excitation when in contact under load, creating noise. To mitigate this issue, smoother transitions were deemed necessary, requiring the implementation of parabolic tip relief and transition fillet radii instead of linear tip relief tooth grinding. Simulations also demonstrated superior PPTE values with parabolic tip reliefs compared to linear tip reliefs for each gear mesh.
It is acknowledged that, regardless of the fidelity of the virtual analysis model, it remains challenging to encompass all system and assembly-level parameters and behaviors in software simulations. In response to these unknowns, it was recommended that the tooth profile grinding manufacturer produce various min/max samples within the proposed microgeometry tolerance band. This approach would allow for the physical observation of noise improvements resulting from different values of profile slope (fhα), tip relief, and crown.
The three profiles above (Figure 5) referred to as Nominal, Minimum, and Maximum profiles illustrate the grinding trials described earlier. Utilizing a single flank grinding machine, various possible profiles were manufactured to simulate the effects of manufacturing variations in large batch production and to identify profiles yielding improved noise results. Lead charts were prepared alongside these profiles, where “Nominal,” “Min” and “Max” denoted the target, minimum, and maximum lead modifications based on the microgeometry of the proposed design. Special instructions for providing 2nd-degree parabolic tip relief and a smoother transition included specifying the intended profiles on the K chart such as Figure 5B.
Multiple samples of each design combination (nominal, minimum, and maximum) were produced for use in transmission applications during field and laboratory testing, marking a significant advancement in the solution’s development and testing phase. It was discovered that intentionally introducing a limited negative slope helped enhance noise levels, leading to the incorporation of these fhα modifications into the design.
Verification
Contact pattern validation is carried out to verify to check gears are manufactured based on desired gear profile and lead parameters. Physical contact patterns are also well aligned with the simulated gear contact pattern.
Transmission error, which is a major source for gear whine, showed significant improvement by accommodating gear macro and microgeometry improvements, listed below Figure 8.
PPTE throughout this research is depicted in the plots below. The blue markers represent PPTE at nominal design values while the black markers represent the minimm and maximum PPTE results of the tolerance study in the virtual simulation model.
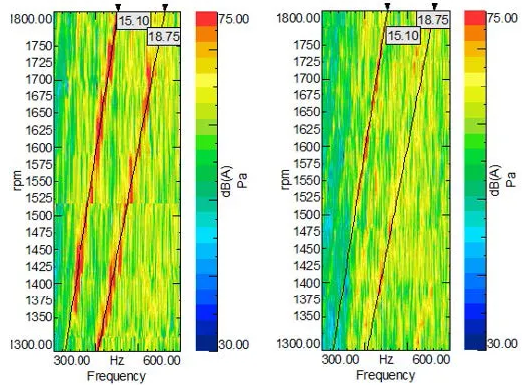
With the proposed gear modification, field testing is executed to verify the response. By keeping the test methodology and instrumentation the same, noise data were recorded and analyzed. With the proposed modification, there was significant noise level reduction compared to the baseline design as shown in Figure 9. Also, jury testing was carried out for subjective evaluation to confirm the outcome, i.e., noise reduction. After confirming all these trials and meeting the noise reduction targets, the recommended design modification was implemented. This resulted in enhanced customer comfort.
BRIEF INTRODUCTION
Cnbearing is the No.1 bearing inquiry system and information service in China, dedicated to helping all bearing users and sellers throughout the world.
Cnbearing is supported by China National Bearing Industry Association, whose operation online is charged by China Bearing Unisun Tech. Co., Ltd.
China Bearing Unisun Tech. Co., Ltd owns all the rights. Since 2000, over 3,000 companies have been registered and enjoyed the company' s complete skillful service, which ranking many aspects in bearing industry at home and abroad with the most authority practical devices in China.


